Tuesday, February 26, 2019

Dining Room Redesign

It's no joke that renovating a space can be quite pricey.  That's why I can't ever do any one project all at once, it just isn't in my budget.  I usually go through phases when upgrading spaces or pieces.  I've definitely been in a phase of buying lately, but it didn't come all at once. Things just happened to fall into place and I found exactly what I was looking for.  I wanted to start upgrading the dining room and it started with a table, chairs the same week, but months went by before I found a rug and just last week, the perfect chairs to finish off the majority of the room arrived.   

To break this down (aside from the light fixture that will be relocated eventually), all the upgrades I purchased totaled a little more than $1,500.
Here's a before shot of the room a few years prior. 
Here's a shot facing the same wall now.
The artwork is a piece my mom painted that I relocated from the hallway upstairs.
The frame reminds me of driftwood and is perfect with the new table and chairs.
It works so much better in this room and adds some much needed color with the neutral tones in the room.
The rustic reclaimed wood table was my first purchase.  It reminded me so much of ones like THESE from Restoration Hardware.... at almost 1/4 or more of the cost! 
The black sideboard from the before picture was relocated from the Great Room along with the lamps that occupied it.
I moved the mirror that once occupied the foyer above the sideboard.
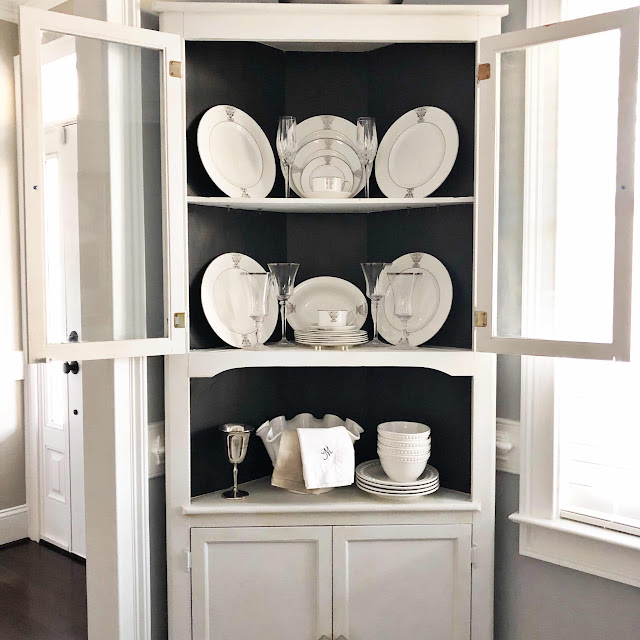
The corner cabinet got a fresh coat of paint and hardware to brighten up the space.
For more about the corner cabinet redo, click HERE 
The rug was a perfect fit and color combo, AND on sale right after Christmas from Rugs USA
These tall slipcovered wing back host chairs were perfect and add some height to the room.
Plus, I love that they are slipcovered and can be removed to clean. 
Lastly, I topped it all off with a small brass art lamp to illuminate the marsh art my mom painted!
It tops off everything so well! 
Here's a breakdown with links included: *Salvaged Wood Table:  Southeastern Salvage $ 488.00
*X Back Dining Chairs : Tuesday Morning $200.00
*7'x9' Faded Tribal Rug:  Rugs USA   $137.00
*Rustoleum Charcoal Chalk Paint: Amazon $16.98
*Rustoleum Linen White Chalk Paint: Amazon  $16.98
*Art Lamp: Amazon $27.47
*Hainsworth Slipcovered Dining Chairs x2 : Wayfair $605.88
*Threshold Marble Knobs: Target $17.98                           

Grand Total: $1,510.29

Eventually I want to either relocate the chandelier light fixture, but for now, I'm giving my wallet a rest!

Tuesday, February 19, 2019

China Cabinet Chalk Paint Revamp

Painting this corner cabinet that belonged to my granny has been on my to-do list for a while.  It's dark finish didn't work very well in my dining room.  When it comes to projects like this, I tend to get overwhelmed.  What color?  Where should I paint it?  Should I put a tarp down in the dining room and have a mess or should I transfer it to the garage so I'm not so worried about getting things messed up in the house.
A few weeks ago, I decided on a color.  I thought going with a lighter shade would brighten up this corner and work better with the current decor.  I ultimately decided to paint the interior a dark charcoal color (which I already knew I liked since I painted 2 other pieces this color.  My china is white, so I knew I wanted a darker color on the back wall of the cabinet so that the china would stand out.
I ordered the paint, started taping the glass, but when it came time to actually begin painting, I became completely unmotivated.  It's not the actual painting that's the pain, it's the removal of hardware and taping off the inside and getting the cabinet moved onto a tarp that's irritating.  
Finally Thursday night, I threw in the towel and said, screw this, it's time to reclaim my dining room and get this thing done! 


I'm so pleased by how it turned out and I'm so glad I decided on a dark backdrop! 

Marble and brushed gold pulls from Target 
Here's the before.  I relocated some of my glassware to the bar cabinet, and added some more of the china.  


Much better!  
*Quick note:  I originally bought a smoked glaze to use as a top coat, but decided I didn't want it to look distressed, or antique, so I went with my original matte top coat I used on all my chalk paint projects.  However, once it dried, it made the white look dingy and antique, so I went back over with another coat of the linen white. 

All items used: 

I'm so excited to have this project done and marked off my list....however there are PLENTY more! 
Happy Tuesday! 

Friday, February 15, 2019

Pressure Cooker Mississippi Pot Roast

I know quite a few people that have either bought or received pressure cookers recently.  As intimidating and scary as they may seem, once you get through the initial pressure test and make your first meal, you'll be hooked!  
I've had mine now going on 2 years and we've loved it, but once this one konks out, I may get an Instant Pot instead.  I would rather have a stainless steel inner pot, and the Power brand doesn't offer that as an option.  
This is the one I use, but the Instant Pot is fairly similar, so the cook times are most likely similar and they have some of the same features.

We have loved ours and I cook more often and it's so quick and easy!   


Mississippi Pot Roast 
I'm not kidding when I say we probably make this once a week.  I'm kind of burnt out on it, but Chad makes it for himself now it's so easy.

Ingredients:
- 3 to 4 pound roast
- Pack of Ranch seasoning mix
- Pack of Au Jus seasoning mix
- 1/2 stick of butter (optional)
- 1/2 jar of peperoncinis (with the juice)

*Cut roast into cubes and add to your pot. 
Press the chicken/meat button and brown the meat until all sides are cooked.  (This takes about 8-10 minutes).

Place your lid on the pot and make sure it's secure (make sure you've followed instructions and have done your test run with water and make sure you know how to secure the lid correctly.

Select the Chicken/Meat button again, then press the 'cook time selector' button in the middle twice to move the time to 1 hour.

Once the pot has pressurized, you'll see the countdown timer start.
Once it's finished, make sure you have read all instructions on how to depressurize and remove the lid.

Shred and serve.

I love this recipe because you literally throw the items in the pot and turn it on.  There's really no effort involved.  For larger roasts, I sometimes have to add an additional 20 minutes for it to be tender enough to shred.  If yours isn't falling apart and you can't cut it with a fork, put the lid back on and add an additional 20 minutes.

I love the pressure cooker because it's a great substitute for a crock pot, but the food cooks in 1/4 time.  A roast like this could take 6-8 hours to cook in a crock pot, but in a little over an hour, you're done.

Here's a lineup of what we cook on a consistent basis and that I'll post more about soon:

-Chicken and noodles
-Chili
-Vegetable beef soup
-Chicken tacos
-Cabbage and sausage
-Basic chicken to use on salads
-Taco soup
-Lasagna soup
-Ziti with meatballs
-Chicken bog
-Boiled peanuts
-Corn on the cob